


Contents
Introduction
Autodesk Maya is equipped with numerous features, and given its ease of expansion, individuals and companies add even more functions. Therefore, for users, it's not uncommon to wonder what each menu item does or how to use it. Maya's menu has something called annotation, which, when a mouse cursor hovers over a menu item, displays its content at the bottom-left of the screen. However, due to character limitations and small font size, it's not particularly user-friendly.
Considering this situation, I believed that having a tooltip for each menu item, which provides a brief description or illustrated usage examples in a flipbook style, would aid in more efficient operations.
Environment
In this article, we've verified the content using Maya windows 2020 - 2024. A certain level of knowledge about Python and Qt is assumed. The code snippets created for this article are available on Github/Gist. Please refer to it as necessary.
What is a Tooltip?
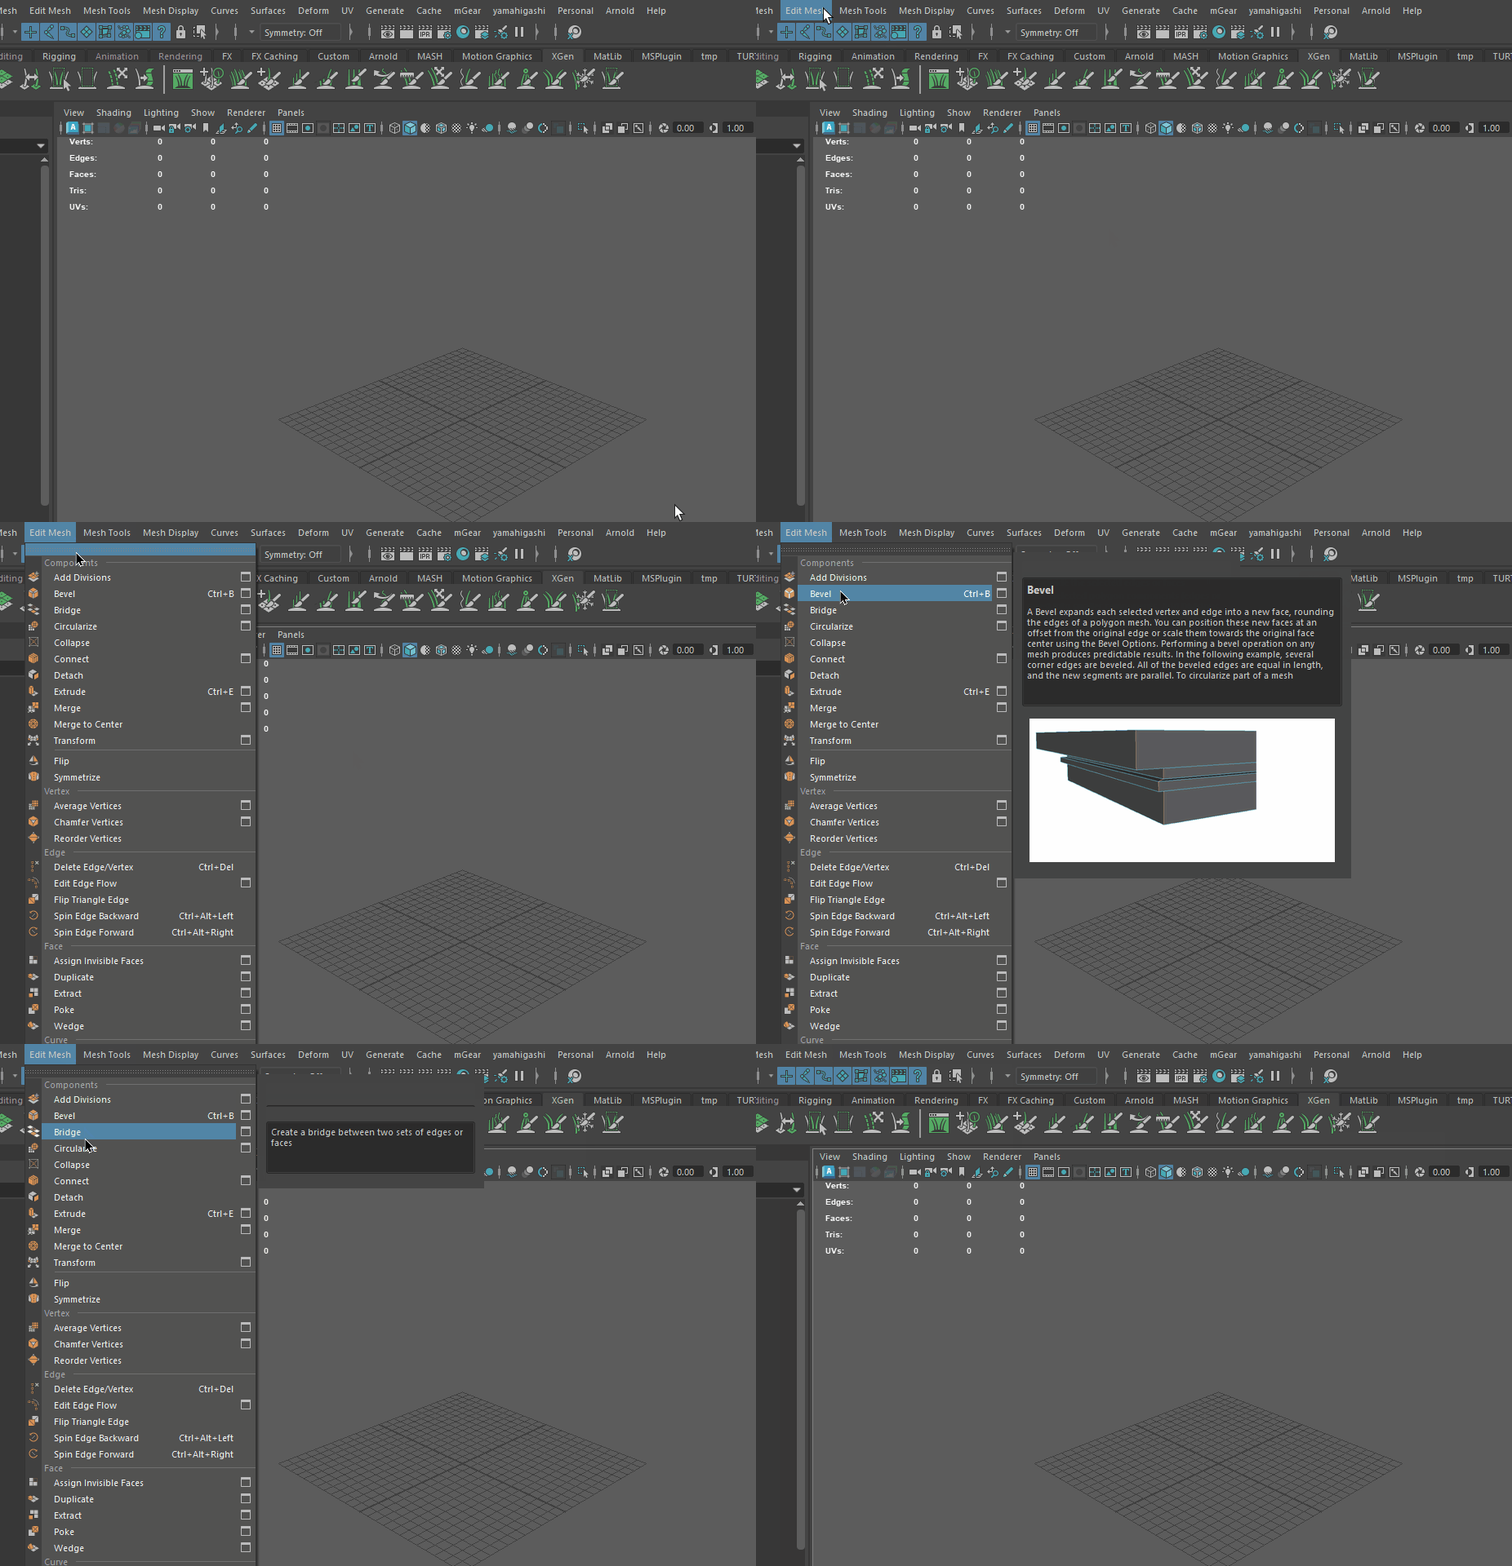
The tooltip we're creating this time refers to something like this:
Maya's UI and Menu
Before diving deep, let's touch upon the handling of menus in Maya and its relationship with Qt.
Since C:\Program Files\Autodesk\Maya2023\scripts\startup, you'll see. In other words, Maya is structured as an application by creating Qt objects through mel commands.
There are actually two ways to access the existing interface. You can call the mel command in query mode to retrieve information about existing elements. Alternatively, you can obtain Qt object representations by traversing descendant elements from QApplication or using the find method. Each method has its capabilities and limitations, and they often complement each other in operation. Accessing existing elements as Qt objects can be tricky, but knowing this broadens what you can do, not just in this instance. It's worth knowing.
Maya's menu is also broken down and constructed into elements like QMenu, QWidget, and QWidgetAction through mel commands. The strategy this time is to access them, capture hover events, and incorporate the display of custom Qt elements.
Retrieving Menu Elements
Let's start by fetching the existing menu items. Each menu has its own unique path. It behaves similarly to a typical file path, using | as a delimiter, extending from the root to its child elements. Using this path with the mel command, we can access the attributes of that menu.
For instance, to fetch child elements within the menu with a path like MayaWindow|MENU_ITEM_PATH, you would use:
menu -q -itemArray MayaWindow|MENU_ITEM_PATH;To obtain the label displayed in the UI, you'd write:
menu -q -label MayaWindow|MENU_ITEM_PATH;For more details, please refer to the official documentation.
Now, let's examine the case when dealing with Qt objects. In a Qt application, there are several methods to fetch the desired object. Here, we'll explore the method of tracing parent-child relationships. First, let's retrieve the main window of Maya is to do this,
from PySide2.QtWidgets import (
    QApplication,
)

def get_maya_window():
    # type: () -> QWidget
    for obj in QApplication.topLevelWidgets():
        if obj.objectName() == "MayaWindow":
            return obj
    else:
        raise Exception("Maya main window not found")

main_window = get_maya_window()
Let's try to enumerate all descendants using QObject.children(). We'll use recursion for this.
def debug_print_all_objects():

    def recursive(parent, depth):
        for child in parent.children():

            indent = " " * depth
            print(indent, parent, child.objectName(), child)

            recursive(child, depth + 1)

    recursive(get_maya_window(), 0)

debug_print_all_objects()
I recommend executing this code right after launching the application (reasons to be discussed later). Since this will list all elements of the application, it might take a while to execute. After a bit, logs like the following will start to flow.
 <PySide2.QtWidgets.QMainWindow(0x206f476e520, name="MayaWindow") at 0x00000206AF1FAB40> _layout <PySide2.QtWidgets.QLayout(0x206d6407000, name = "_layout") at 0x00000206AF13D580>
 <PySide2.QtWidgets.QMainWindow(0x206f476e520, name="MayaWindow") at 0x00000206AF1FAB40>  <PySide2.QtWidgets.QShortcut(0x206f47fcf40) at 0x00000206AF1BBF40>
 <PySide2.QtWidgets.QMainWindow(0x206f476e520, name="MayaWindow") at 0x00000206AF1FAB40>  <PySide2.QtWidgets.QMenuBar(0x206f476e0e0) at 0x00000206AF155700>
  <PySide2.QtWidgets.QMenuBar(0x206f476e0e0) at 0x00000206AF155700> qt_menubar_ext_button <PySide2.QtWidgets.QToolButton(0x206f476eee0, name="qt_menubar_ext_button") at 0x00000206AF1F3FC0>
  <PySide2.QtWidgets.QMenuBar(0x206f476e0e0) at 0x00000206AF155700> workspaceSelectorLayout <PySide2.QtWidgets.QWidget(0x206f9879130, name="workspaceSelectorLayout") at 0x00000206AF1F30C0>
   <PySide2.QtWidgets.QWidget(0x206f9879130, name="workspaceSelectorLayout") at 0x00000206AF1F30C0> workspaceSelectorLayout <PySide2.QtWidgets.QHBoxLayout(0x206f450cb80, name = "workspaceSelectorLayout") at 0x00000206AF1FAA80>
   <PySide2.QtWidgets.QWidget(0x206f9879130, name="workspaceSelectorLayout") at 0x00000206AF1F30C0> workspaceLbl <PySide2.QtWidgets.QLabel(0x206f9879c30, name="workspaceLbl") at 0x00000206AF1FAE00>
   <PySide2.QtWidgets.QWidget(0x206f9879130, name="workspaceSelectorLayout") at 0x00000206AF1F30C0> workspaceSelectorMenu <PySide2.QtWidgets.QComboBox(0x206f45b0ef0, name="workspaceSelectorMenu") at 0x00000206AF1FA640>
    <PySide2.QtWidgets.QComboBox(0x206f45b0ef0, name="workspaceSelectorMenu") at 0x00000206AF1FA640>  <PySide2.QtGui.QStandardItemModel(0x206f99abcb0) at 0x00000206AF1FA380>

...
snip
By filtering through these logs with specific conditions, you can retrieve the desired item. When written as code,
def get_qt_object_at_path(menu_item_path):
    # type: (Text) -> QWidgetAction
    """Retrieves a qt object from given Maya menu item path."""

    def _find_recursive(parent, name, offset):
        # type: (QObject, Text, int) -> Optional[QWidgetAction]
        for child in parent.children():

            if child.objectName() == name:

                if isinstance(child, QWidgetAction):
                    index = child.parentWidget().children().index(child)
                    target_widget = child.parentWidget().children()[index + offset]
                    return target_widget
                else:
                    return child

            else:
                x = _find_recursive(child, name, offset)
                if x:
                    return x

    path = menu_item_path.replace("MayaWindow|", "")  # Remove MayaWindow prefix

    # Because the object name may not be unique,
    # we need to find the parent menu widget first by hierarchy.
    parent = get_maya_window()
    for menu in path.split("|")[0:-1]:
        p = _find_recursive(parent, menu, 2)
        if p is not None:
            parent = p
        else:
            print("Menu widget not found: {}, {}".format(parent, menu))

    qobject = _find_recursive(parent, path.split("|")[-1], 0)
    if qobject is None:
        raise Exception("object not found: {}".format(menu_item_path))

    return qobject


path = "MayWindow|MENU_ITEM_PATH"
the_object = get_qt_object_at_path(path)
It looks like this. Before we dive into the explanation of this code, there are a few pitfalls we need to address. We'll discuss these in the next section.
Creating and Initializing Menu Item Elements
From the overview of the tree shown in the previous logs, we can deduce several things about the menu:
- Within the main menu QMenuBar, each submenu (
File,Edit,Create...) exists as a QMenu. - Although there should be corresponding items inside the QMenu (
New Scene,Open Scenes...), they aren't apparent.
The truth is, each item in Maya's (built-in) UI does not exist until it is actually used. The object is created only when it's about to be used. This means if you try to find it before it's created, you won't locate it. In this example, when you click the menu bar button (File), the menuItem is executed, and the object is created. Now, I'd like you to execute the previous code after opening a menu once.
  <class 'PySide2.QtWidgets.QMenuBar'>()>>	<PySide2.QtWidgets.QMenu(0x206fa099ef0, name="mainFileMenu") at 0x00000206AF1F3300>
   <class 'PySide2.QtWidgets.QMenu'>(mainFileMenu)>>	<PySide2.QtWidgets.QAction(0x206fa00bc50 text="File" toolTip="File" menuRole=TextHeuristicRole visible=true) at 0x00000206AF1FAEC0>
   <class 'PySide2.QtWidgets.QMenu'>(mainFileMenu)>>	<PySide2.QtCore.QObject(0x206fa00be90) at 0x00000206AF1FA040>
   <class 'PySide2.QtWidgets.QMenu'>(mainFileMenu)>>	<PySide2.QtCore.QObject(0x206a5a657e0) at 0x00000206AF1FA880>
   <class 'PySide2.QtWidgets.QMenu'>(mainFileMenu)>>	<PySide2.QtWidgets.QWidgetAction(0x207261844c0 text="New Scene" toolTip="Create a new scene" shortcut=QKeySequence("Ctrl+N") menuRole=TextHeuristicRole visible=true) at 0x00000206AF1FA600>
    <class 'PySide2.QtWidgets.QWidgetAction'>(New Scene)>>	<PySide2.QtCore.QObject(0x206a5a930a0) at 0x00000206AF143CC0>
   <class 'PySide2.QtWidgets.QMenu'>(mainFileMenu)>>	<PySide2.QtWidgets.QWidget(0x207260dcb60) at 0x00000206AF1FAE80>
   <class 'PySide2.QtWidgets.QMenu'>(mainFileMenu)>>	<PySide2.QtWidgets.QWidgetAction(0x20726186de0 text="newFileOptions" toolTip="New scene options" menuRole=TextHeuristicRole visible=false) at 0x00000206AF1FAB00>
    <class 'PySide2.QtWidgets.QWidgetAction'>(newFileOptions)>>	<PySide2.QtCore.QObject(0x206a5a96520) at 0x00000206AF143D80>
   <class 'PySide2.QtWidgets.QMenu'>(mainFileMenu)>>	<PySide2.QtWidgets.QWidget(0x207260dd150) at 0x00000206AF1FA0C0>
   <class 'PySide2.QtWidgets.QMenu'>(mainFileMenu)>>	<PySide2.QtWidgets.QWidgetAction(0x20726186c90 text="Open Scene..." toolTip="Open a scene" shortcut=QKeySequence("Ctrl+O") menuRole=TextHeuristicRole visible=true) at 0x00000206AF1FAD40>
    <class 'PySide2.QtWidgets.QWidgetAction'>(Open Scene...)>>	<PySide2.QtCore.QObject(0x206a5a94cc0) at 0x00000206AF143D40>
   <class 'PySide2.QtWidgets.QMenu'>(mainFileMenu)>>	<PySide2.QtWidgets.QWidget(0x207260dd1a0) at 0x00000206AF1FA940>
   <class 'PySide2.QtWidgets.QMenu'>(mainFileMenu)>>	<PySide2.QtWidgets.QWidgetAction(0x20726185bf0 text="openFileOptions" toolTip="Open scene options" menuRole=TextHeuristicRole visible=false) at 0x00000206AF1FA2C0>
    <class 'PySide2.QtWidgets.QWidgetAction'>(openFileOptions)>>	<PySide2.QtCore.QObject(0x206a5a94f40) at 0x00000206AF143CC0>
   <class 'PySide2.QtWidgets.QMenu'>(mainFileMenu)>>	<PySide2.QtWidgets.QWidget(0x207260ddb00) at 0x00000206AF1FAE00>
   <class 'PySide2.QtWidgets.QMenu'>(mainFileMenu)>>	<PySide2.QtWidgets.QWidgetAction(0x20726186d70 text="" menuRole=TextHeuristicRole visible=true) at 0x00000206AF1FA680>
You'll likely see fragments of menu items now. This is why I earlier recommended executing right after launching. So, does this mean you need to manually click the button to create a menu item, or can you execute it from the script? Of course, it can be done.
import maya.mel

menu_path = "MayaWindow|mainFileMenu"
command = cmds.menu(menu_path, q=True, postMenuCommand=True)
maya.mel.eval(command)
This way, you can fill the menu with menu items without having to click on them yourself.
Menu Item Retrieval 2nd
Finally, let's delve into the explanation of get_qt_object_at_path. If we show a schematic of the Qt menu subtree, it looks like:
Menu content is flat:
    Parent (QMenu)
    - MenuA action (QWidgetAction)
    - MenuA widget (QWidget)
    - MenuB action (QWidgetAction)
    - MenuB widget (QWidget)
    ...

there's folder inside the menu:
    Parent (QMenu)
        - SubParent action (QWidgetAction)
        - SubParent widget (QWidget)
        - SubParent menu   (QMenu)
            - MenuA action (QWidgetAction)
            - MenuA widget (QWidget)
            - MenuB action (QWidgetAction)
            - MenuB widget (QWidget)
    ...
It's structured like this. Therefore, in get_qt_object_at_path, the search for menu items from a menu path (e.g., MayaWindow|mainFileMenu|menuItem557) is divided into two steps: the part that searches for the folder
parent = get_maya_window()
for menu in path.split("|")[0:-1]:
p = _find_recursive(parent, menu, 2)
if p is not None:
parent = p
else:
print("Menu widget not found: {}, {}".format(parent, menu))and the part that searches for the menu item.
parent = get_maya_window()
for menu in path.split("|")[0:-1]:
p = _find_recursive(parent, menu, 2)
if p is not None:
parent = p
else:
print("Menu widget not found: {}, {}".format(parent, menu))
qobject = _find_recursive(parent, path.split("|")[-1], 0)
if qobject is None:
raise Exception("object not found: {}".format(menu_item_path))Next, let's look at the roles of the QWidgetAction and QWidget retrieved by this code.
QWidgetAction and QWidget
QWidgetAction is commonly used to add custom widgets to parent elements
such as menu bars and toolbars. It's designed to provide a widget-accompanied response when the user performs some
operation on the parent element. In the case of menus, it returns some response when the user clicks on a menu item.
Referring to the schematic diagram mentioned earlier, behavior settings are done in MenuA action, and its appearance
is reflected in MenuA widget. To create tooltips, it's necessary to monitor the hover event,
making the acquisition of this action crucial.
Now, you might wonder if QWidgetAction and QWidget have a one-to-one correspondence. In reality, they don't. For a single menu item, there is always one Action, but there can be multiple Widgets. For instance, in the case of a trade-off, a new shadow QWidget is created separately from the main one. While the behavior of the menu remains constant, there are multiple pathways to trigger it. It's important to keep this in mind when creating tooltips because, to determine the end of a hover or the position of the tooltip, it's essential not only to retrieve the Action but also the target widget.
Implementing the Tooltip
Let's delve into the core implementation of the tooltip. Let's first summarize what's needed: The outline is
- When the mouse cursor hovers over a menu item,
- Display the tooltip widget next to the menu item.
- When the mouse cursor exits the area,
- Hide the tooltip widget.
Creating the Tooltip Widget
First, let's define the necessary components. Here's the very basic one.
class HoverHelpWidget(QWidget):
    """Hover tooltip widget"""

    def __init__(self, message):
        super(HoverHelpWidget, self).__init__()
        self.setWindowFlags(
            C.WindowStaysOnTopHint |
            C.ToolTip
        )

        layout = QVBoxLayout()

        self.contents = QLabel(self)
        self.contents.setText(message)
        layout.addWidget(self.contents)

        self.setLayout(layout)
        self.hide()
We've prepared something simple that just displays text. With setWindowFlags,
we've adjusted the behavior to resemble a tooltip. We want to register this for
the hovered event.
Show the Widget on Hover start
def show_menu_tooptip(tooltip_widget):
    # type: (QWidget) -> None
    """Shows menu help widget on right side of given widget."""

    under_cursor_widget = QApplication.widgetAt(QCursor.pos())
    container_global_pos = under_cursor_widget.mapToGlobal(QPoint(0, 0))
    help_widget_x = container_global_pos.x() + under_cursor_widget.width() + 2
    help_widget_y = container_global_pos.y() - 20
    tooltip_widget.move(help_widget_x, help_widget_y)
    tooltip_widget.show()


message = "This is tooltip message."
tooltip_widget = HoverTooltipWidget(message)
target_action = get_qt_object_at_path(menu_item_path)
target_action.hovered.connect(lambda: show_menu_tooptip(tooltip_widget))
From the bottom three lines, we can see the creation of the tooltip, the acquisition
of QWidgetAction, and the display of the tooltip widget in response to the hover event.
Also, inside show_menu_tooptip, we retrieve the coordinates of the widget under the
cursor and move the widget. Instead of referencing the widget directly from QWidgetAction,
we obtain the under_cursor_widget using QApplication.widgetAt(QCursor.pos()). This
is because there seems to be no way to retrieve the target widget directly from QWidgetAction.
If anyone knows a method, I would appreciate hearing about it.
Hide the Widget on Hover End
We want it to disappear when it's no longer needed. There are several methods to achieve this, but here we will hook into the event of the widget under the hover to hide the tooltip. Please refer to the Qt reference for details.
# avoid garbage collection, store filters in global variable
__MENU_HELP_EVENT_FILTERS__ = [] # type: List[HoverEventFilter]
class HoverEventFilter(QObject):
"""Hover event filter.
This filter shows and hides given widget on hover events.
"""
def __init__(self, hover_widget):
super(HoverEventFilter, self).__init__()
self.hover_widget = hover_widget
self.delete_later = False
def eventFilter(self, watched, event):
# type: (QObject, QEvent) -> bool
"""Event filter."""
global __MENU_HELP_EVENT_FILTERS__ # pylint: disable=global-statement
if any((
event.type() == QEvent.HoverLeave,
event.type() == QEvent.Leave,
event.type() == QEvent.Hide,
event.type() == QEvent.FocusOut,
event.type() == QEvent.WindowDeactivate,
event.type() == QEvent.Enter, # Explicitly squash, quick focus change will trigger this unintentionally
)):
self.hover_widget.hide()
self.deleteLater()
self.delete_later = True
try:
__MENU_HELP_EVENT_FILTERS__.remove(self)
except ValueError:
pass
return True
if any((
event.type() == QEvent.HoverEnter,
)):
if self.delete_later:
return True
self.hover_widget.show()
return True
return FalseBy defining the HoverEventFilter that inherits QObject and overriding eventFilter,
and then using installFilter on the target widget, we can achieve this. Lines 22-27
determine what action to take for which event. Here, multiple conditions are set for
the tooltip to disappear. This is because the Qt event interval is lax,
so it doesn't accurately capture all user behavior. It's common for the expected
Leave mouse action not to be detected. Therefore, it's a good idea to ensure that
the tooltip also disappears when, for example, the menu disappears in case of a missed
determination. We'll set this up inside show_menu_tooltip_help.
def show_menu_tooltip_help(tootip_widget):
# type: (QWidget) -> None
"""Shows menu help widget on right side of given widget."""
global __MENU_HELP_EVENT_FILTERS__ # pylint: disable=global-statement
event_filter = HoverEventFilter(tootip_widget)
under_cursor_widget = QApplication.widgetAt(QCursor.pos())
under_cursor_widget.installEventFilter(event_filter)
__MENU_HELP_EVENT_FILTERS__.append(event_filter)
container_global_pos = under_cursor_widget.mapToGlobal(QPoint(0, 0))
help_widget_x = container_global_pos.x() + under_cursor_widget.width() + 2
help_widget_y = container_global_pos.y() - 20
tootip_widget.move(help_widget_x, help_widget_y)
tootip_widget.show()Lines 7 and 9 create and install the filter. You may notice that MENU_HELP_EVENT_FILTERS is defined globally. This is because if defined in a local scope, the filter instance created would be deleted after exiting the scope. To prevent its deletion, we need to retain a reference to it, hence the global definition.
With this, we've implemented a basic functioning tooltip. Cheers!
Customization and Additional Features
The tooltip we introduced earlier had only the most basic display capabilities. Let's take it a step further and enhance it. Basically, anything you can do with a Qt Widget is possible, so I encourage everyone to experiment on their own. However, as an example, let's look at the following:
- Markdown support
- Image display support
- Rotating multiple images over time
Markdown
Using Markdown package from pypi. If
import markdown
html = markdown.markdown(md)
With this code, you can retrieve a string that has been rendered to html.
You can then use setHtml
on QTextEdit/QTextBrowser.
Image Display
To display multiple images while switching them over time, use:
class ImageRotatingWidget(QWidget):
    """Rotating image widget"""

    DURATION_MILLISECOND = 800  # 0.8 seconds

    def __init__(self, parent, image_paths):
        # type: (QWidget, List[Text]) -> None

        super(ImageRotatingWidget, self).__init__(parent)

        self.layout = QVBoxLayout(self)  # type: QVBoxLayout
        self.image_label = QLabel(self)
        self.layout.addWidget(self.image_label)

        self.image_paths = image_paths
        self.current_image_index = 0

        # start timer
        self.timer = QTimer(self)
        self.timer.timeout.connect(self.update_image)
        self.timer.start(self.DURATION_MILLISECOND)

        self.update_image()

    def update_image(self):
        current_image_path = self.image_paths[self.current_image_index]
        pixmap = QPixmap(current_image_path)
        self.image_label.setPixmap(pixmap)

        self.current_image_index = (self.current_image_index + 1) % len(self.image_paths)

    def showEvent(self, event):
        super(ImageRotatingWidget, self).showEvent(event)

        self.current_image_index = 0
        current_image_path = self.image_paths[self.current_image_index]
        pixmap = QPixmap(current_image_path)
        self.image_label.setPixmap(pixmap)

        self.current_image_index = (self.current_image_index + 1) % len(self.image_paths)
prepare a widget like this, and you simply need to addWidget it to the tooltip.
Let's summarize the achievements up to this point as code.
class HoverTooltipWidget(QWidget):
"""Hover help widget"""
MAX_IMAGE_WIDTH = 600
def __init__(self, message):
super(HoverTooltipWidget, self).__init__()
self.setWindowFlags(
# C.FramelessWindowHint |
# C.WindowDoesNotAcceptFocus |
C.WindowStaysOnTopHint |
C.ToolTip
)
layout = QVBoxLayout()
self.contents = QTextEdit(self)
layout.addWidget(self.contents)
# to avoid image display issue, use QLabel instead of QTextEdit with html
self.images = re.findall(r'<img alt="" src="([^"]+)" />', message)
message = re.sub(r'<p>(<img alt="" src="([^"]+)" />[ \n]*)+</p>', "", message)
self.contents.setHtml(message)
if len(self.images) == 0:
pass
elif len(self.images) == 1:
pixmap = QPixmap(self.images[0])
width = min(pixmap.width(), self.MAX_IMAGE_WIDTH)
pixmap = pixmap.scaledToWidth(width)
img = QLabel(self)
img.setPixmap(pixmap)
layout.addWidget(img)
else:
self.rotate_images = ImageRotatingWidget(self, self.images)
layout.addWidget(self.rotate_images)
self.setLayout(layout)
self.hide()
def showEvent(self, event):
super(HoverTooltipWidget, self).showEvent(event)
self.adjust_contets_size()
def adjust_contets_size(self):
# type: () -> None
"""Adjust contents size"""
doc_height = self.contents.document().size().height()
doc_height = doc_height + 30
self.contents.setFixedHeight(doc_height)
self.contents.adjustSize()
self.adjustSize()
# avoid garbage collection, store filters in global variable
__MENU_HELP_EVENT_FILTERS__ = [] # type: List[HoverEventFilter]
class HoverEventFilter(QObject):
"""Hover event filter.
This filter shows and hides given widget on hover events.
"""
def __init__(self, hover_widget):
super(HoverEventFilter, self).__init__()
self.hover_widget = hover_widget
self.delete_later = False
def eventFilter(self, watched, event):
# type: (QObject, QEvent) -> bool
"""Event filter."""
global __MENU_HELP_EVENT_FILTERS__ # pylint: disable=global-statement
if any((
event.type() == QEvent.HoverLeave,
event.type() == QEvent.Leave,
event.type() == QEvent.Hide,
event.type() == QEvent.FocusOut,
event.type() == QEvent.WindowDeactivate,
event.type() == QEvent.Enter, # Explicitly squash, quick focus change will trigger this unintentionally
)):
self.hover_widget.hide()
self.deleteLater()
self.delete_later = True
try:
__MENU_HELP_EVENT_FILTERS__.remove(self)
except ValueError:
pass
return True
if any((
event.type() == QEvent.HoverEnter,
)):
if self.delete_later:
return True
self.hover_widget.show()
return True
return False
class ImageRotatingWidget(QWidget):
"""Rotating image widget"""
DURATION_MILLISECOND = 800 # 1.2 seconds
def __init__(self, parent, image_paths):
# type: (QWidget, List[Text]) -> None
super(ImageRotatingWidget, self).__init__(parent)
self.layout = QVBoxLayout(self) # type: QVBoxLayout
self.image_label = QLabel(self)
self.layout.addWidget(self.image_label)
self.image_paths = image_paths
self.current_image_index = 0
# start timer
self.timer = QTimer(self)
self.timer.timeout.connect(self.update_image)
self.timer.start(self.DURATION_MILLISECOND)
self.update_image()
def update_image(self):
current_image_path = self.image_paths[self.current_image_index]
pixmap = QPixmap(current_image_path)
self.image_label.setPixmap(pixmap)
self.current_image_index = (self.current_image_index + 1) % len(self.image_paths)
def showEvent(self, event):
super(ImageRotatingWidget, self).showEvent(event)
self.current_image_index = 0
current_image_path = self.image_paths[self.current_image_index]
pixmap = QPixmap(current_image_path)
self.image_label.setPixmap(pixmap)
self.current_image_index = (self.current_image_index + 1) % len(self.image_paths)
def get_maya_window():
# type: () -> QWidget
for obj in QApplication.topLevelWidgets():
if obj.objectName() == "MayaWindow":
return obj
else:
raise Exception("Maya main window not found")
def get_qt_object_at_path(menu_item_path):
# type: (Text) -> Tuple[QWidgetAction, QWidget]
"""Retrieves a qt object from given Maya menu item path.
In Qt, menu item name is in format of "menu_item_path".
But in Maya, menu item name is in format of "menu|sub_menu|menu_item".
And the menu hierarchy represented in Qt is,
Case 1: Menu item is a menu
Parent (QMenu)
- MenuA action (QWidgetAction) # This contains some attributes for subsequently listed widgets
- MenuA widget (QWidget) # This is the actual widget that we want to get
- MenuB action (QWidgetAction)
- MenuB widget (QWidget)
...
Case 2: Menu item is a sub menu
Parent (QMenu)
- SubParent action (QWidgetAction)
- SubParent widget (QWidget)
- SubParent menu (QMenu)
- MenuA action (QWidgetAction) # This contains some attributes for subsequently listed widgets
- MenuA widget (QWidget) # This is the actual widget that we want to get
- MenuB action (QWidgetAction)
- MenuB widget (QWidget)
...
...
"""
def _find_recursive(parent, name, offset):
# type: (QObject, Text, int) -> Optional[Union[QWidget, QWidgetAction]]
for child in parent.children():
if child.objectName() == name:
if isinstance(child, QWidgetAction):
index = child.parentWidget().children().index(child)
target_widget = child.parentWidget().children()[index + offset]
return target_widget
else:
return child
else:
x = _find_recursive(child, name, offset)
if x:
return x
path = menu_item_path.replace("MayaWindow|", "") # Remove MayaWindow prefix
# Because the object name may not be unique,
# we need to find the parent menu widget first by hierarchy.
parent = get_maya_window()
for menu in path.split("|")[0:-1]:
p = _find_recursive(parent, menu, 2)
if p is not None:
parent = p
else:
print("Menu widget not found: {}, {}".format(parent, menu))
action = _find_recursive(parent, path.split("|")[-1], 0)
widget = _find_recursive(parent, path.split("|")[-1], 1)
if action is None or widget is None:
raise Exception("Menu widget not found: {}".format(menu_item_path))
if not isinstance(action, QWidgetAction):
raise Exception("Menu widget not found: {}".format(menu_item_path))
if not isinstance(widget, QWidget):
raise Exception("Menu widget not found: {}".format(menu_item_path))
return action, widget
def show_menu_tooltip_help(tootip_widget):
# type: (QWidget) -> None
"""Shows menu help widget on right side of given widget."""
global __MENU_HELP_EVENT_FILTERS__ # pylint: disable=global-statement
event_filter = HoverEventFilter(tootip_widget)
under_cursor_widget = QApplication.widgetAt(QCursor.pos())
under_cursor_widget.installEventFilter(event_filter)
__MENU_HELP_EVENT_FILTERS__.append(event_filter)
container_global_pos = under_cursor_widget.mapToGlobal(QPoint(0, 0))
help_widget_x = container_global_pos.x() + under_cursor_widget.width() + 2
help_widget_y = container_global_pos.y() - 20
tootip_widget.move(help_widget_x, help_widget_y)
tootip_widget.show()
def render_markdown(md_text, script_directory):
# type: (Text, Text) -> Text
"""Renders markdown text to HTML."""
import markdown
if sys.version_info[0] == 2:
try:
md_text = md_text.decode("cp932")
except UnicodeEncodeError:
pass
html = markdown.markdown(md_text)
resolved_html = re.sub(
r'(src|href)="/?(.*)"',
r'\1="{}/\2"'.format(script_directory.replace(os.sep, "/")),
html
)
resolved_html = resolved_html.replace(os.sep, "/")
return resolved_html
def register_menu_help(script_dir, menu_item_path, message):
# type: (Text, Text, Text) -> None
"""Registers menu help widget to Maya menu."""
html = render_markdown(message, script_dir)
tootip_widget = HoverTooltipWidget(html)
target_action, _ = get_qt_object_at_path(menu_item_path)
target_action.hovered.connect(lambda: show_menu_tooltip_help(tootip_widget))Application
By combining this with the menu registration that I previously explained on [Qiita]((https://qiita.com/yamahigashi@github/items/212ca6a71dcd48ee618d),
@menu.command_item("Reset bindpose", divider="Skinning")
def reset_bindpose():
"""
### Reset Bindpose
- select bone
- execute this command

"""
import maya.cmds as cmds
selection = cmds.ls(sl=True, long=True)
bones = cmds.ls(sl=True) or []
bindposes = list(set(cmds.listConnections(bones, d=True, type="dagPose")))
cmds.delete(bindposes)
cmds.dagPose(bp=True, save=True)With just this kind of description, it's possible to perform everything from menu registration to the construction of tooltips all at once. The entire view of the code can be checked here.
Moreover, to convert annotations into tooltips for the built-in menus is like,
def inject_annotation_as_menu_tooltip_to_maya_menu(main_menu_name):
    # type: (Text) -> None
    """Injects help tooltip to Maya menu items."""

    import maya.mel as mel
    import gml_maya.menu as m

    # Get menu items
    kids = []  # type: List[Text]
    kids = cmds.menu(main_menu_name, q=True, itemArray=True)  # type: ignore
    if not kids:
        command = cmds.menu(main_menu_name, q=True, postMenuCommand=True)  # type: ignore
        mel.eval(command)
        kids = cmds.menu(main_menu_name, q=True, itemArray=True)  # type: ignore

    if not kids:
        raise RuntimeError("Failed to get menu items: {}".format(main_menu_name))

    if not isinstance(kids, list):
        kids = [kids]

    # Register menu help
    for kid in kids:
        path = main_menu_name + "|" + kid
        annotation = cmds.menuItem(path, q=True, annotation=True)  # type: Any

        try:
            inject_annotation_as_menu_tooltip_to_maya_menu(path)
        except RuntimeError:
            pass

        if not annotation.strip():
            continue

        register_menu_help(m, path, annotation)


menu_items = [
    "MayaWindow|mainAudioMenu",
    "MayaWindow|mainCartoonMenu",
    "MayaWindow|mainConstraintsMenu",
    "MayaWindow|mainCreateMenu",
    "MayaWindow|mainCreatorMenu",
    "MayaWindow|mainCurvesMenu",
    "MayaWindow|mainDeformMenu",
    "MayaWindow|mainDeformationMenu",
    "MayaWindow|mainDisplayMenu",
    "MayaWindow|mainDynEffectsMenu",
    "MayaWindow|mainEditMenu",
    "MayaWindow|mainEditMeshMenu",
    "MayaWindow|mainFieldsSolverMenu",
    "MayaWindow|mainFileMenu",
    "MayaWindow|mainFluidsMenu",
    "MayaWindow|mainGenerateMenu",
    "MayaWindow|mainHairMenu",
    "MayaWindow|mainHelpMenu",
    "MayaWindow|mainKeysMenu",
    "MayaWindow|mainLightingMenu",
    "MayaWindow|mainMeshDisplayMenu",
    "MayaWindow|mainMeshMenu",
    "MayaWindow|mainMeshToolsMenu",
    "MayaWindow|mainModifyMenu",
    "MayaWindow|mainNCacheMenu",
    "MayaWindow|mainNClothMenu",
    "MayaWindow|mainNConstraintMenu",
    "MayaWindow|mainOpenFlightMenu",
    "MayaWindow|mainOptionsMenu",
    "MayaWindow|mainParticlesMenu",
    "MayaWindow|mainPlaybackMenu",
    "MayaWindow|mainRenTexturingMenu",
    "MayaWindow|mainRenderMenu",
    "MayaWindow|mainSelectMenu",
    "MayaWindow|mainShadingMenu",
    "MayaWindow|mainStereoMenu",
    "MayaWindow|mainSurfacesMenu",
    "MayaWindow|mainUVMenu",
    "MayaWindow|mainVisualizeMenu",
    "MayaWindow|mainWindowMenu",
]

for item in menu_items:
    try:
        inject_annotation_as_menu_tooltip_to_maya_menu(item)
    except RuntimeError:
        print("pass {}".format(item))
You can convert them all at once with code like this.
Conclusion
In this article, we explored the background of Maya's menu and the concrete methods to implement tooltips. We clarified that Qt is behind the scenes and that these are constructed using mel. We also discussed the creation of custom UI widgets and their handling.
While we won't provide a detailed explanation of the output in this article, it's likely unnecessary for readers who have followed along this far. Customizing and extending Maya's UI directly connects to the efficiency of software utilization, and improving user convenience is essential. I hope that the methods and concepts I've described in this article will be helpful to everyone.